Getting Started
Find Your API Keys
Once you've logged-in to the Dodgeball Console, you can find your public API key and private API key in the Developer Center under API Keys. If you don't already have an account, you'll need to contact support.
Adding Dodgeball to your Application
When adding a new feature to your application, we recommend wrapping it in an empty Checkpoint. By default, Checkpoints will allow all requests to proceed. As you gain insight into how that feature is abused, you'll be able to quickly add logic to address the fraud you see.
The same strategy applies if you already have security logic in place: wrap it with an empty Checkpoint and transition over to using it in your own time.
Understanding the Flow
Tracking User Devices
![]()
- Dodgeball should be configured as soon as your application loads.
- When you construct Dodgeball using your public API key, it finds the active list of integrations that need to run on the frontend and loads them.
- When you have a session, and optionally a logged-in user, pass them to Dodgeball. This will configure all loaded integrations and start tracking page views.
Protecting Your Application
-
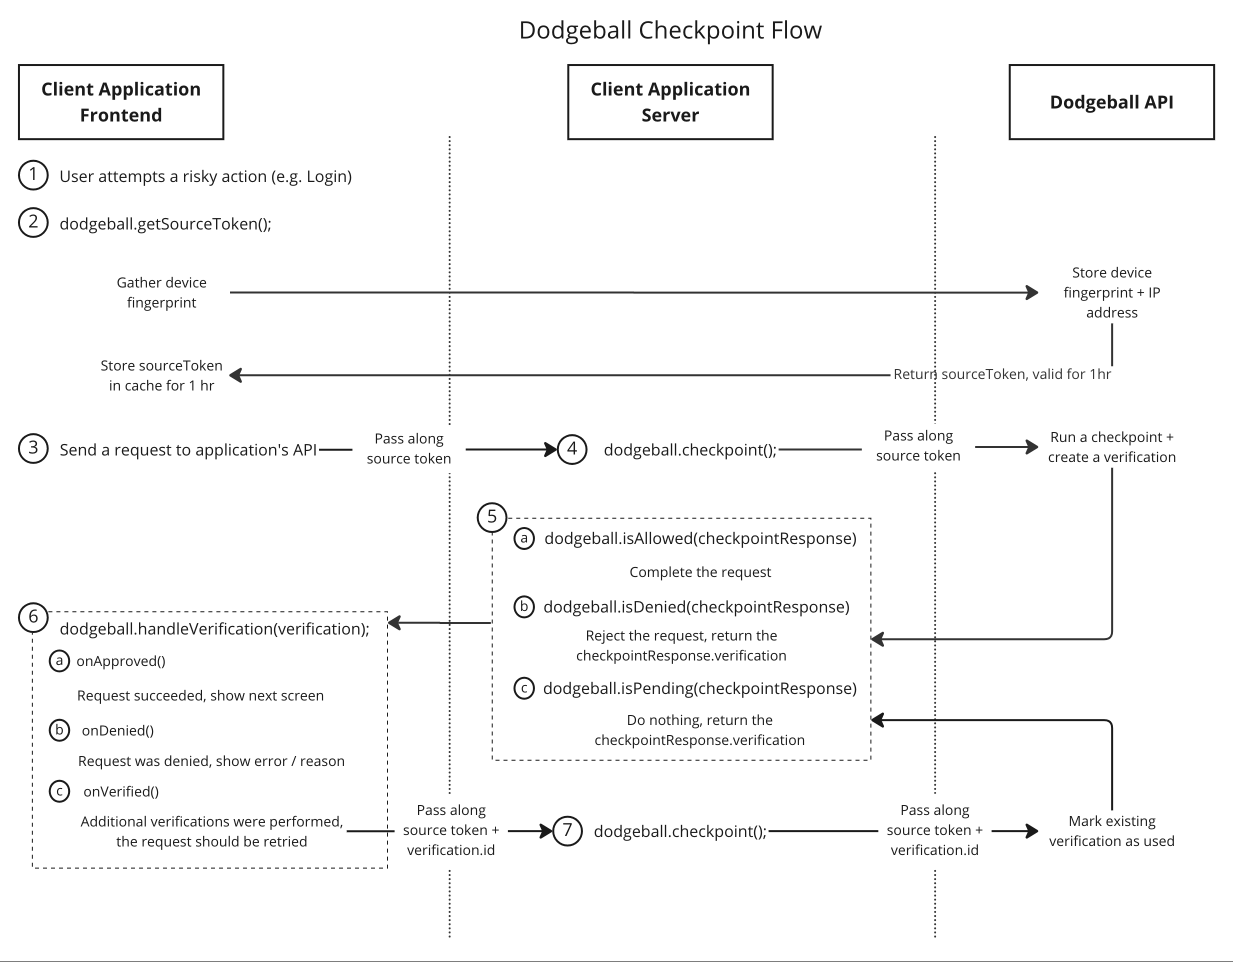
Dodgeball secures any risky action. A risky action is one that may open your application up to fraud (e.g. Registration, Login, Payments, Posting a Listing).
-
To identify who is attempting the risky action, Dodgeball fingerprints the device and returns a token representing the source.
-
When you make a request to your API, send along the source token.
-
Before taking any action, verify that the request should be allowed to proceed by calling a Dodgeball checkpoint. Checkpoints can be called whatever you want (e.g.
BOOK_A_RIDE,MAKE_RESERVATION,POST_LISTING) and can be updated to protect your application without having to touch code. -
The checkpoint will run and create a new verification, which tells your application how to proceed:
a) If allowed, you should complete the request and return a successful response.
b) If denied, you should reject the request and return the verification that was performed — it'll have contain a denial message to display to the user.
c) If pending, no determination on how to proceed has been reached yet. This happens when the checkpoint needs to gather additional information, such as an MFA code or picture of a government ID. You should take no action and return the verification that was performed.
-
When you get a response from your API, use Dodgeball to parse the verification returned, which determines the correct callback to invoke:
a) When the request is allowed, you should inform the user, either by progressing to the next screen in a flow or displaying a success message.
b) When the request is denied, you should display a denial message to the user.
c) If additional information was gathered from the user and they are now allowed to proceed, you should retry the request to your API, being sure to pass along the ID of the verification that was performed.
-
If a verification ID is sent along with a request to your API, send it to the Dodgeball checkpoint. Dodgeball will check if the verification is complete and allowed to proceed. If so, it will be marked as used (to prevent replay attacks) and the request will be allowed to proceed.
Adding Dodgeball to your Application
- Login to your account and visit the Developer Center > API Keys tab to find your public and private Dodgeball API keys. If you don't already have an account, you'll need to contact support.
- Follow the instructions here to integrate the Dodgeball Client SDK into your application's frontend code.
- Follow the instructions here for your server-side language here to integrate the Dodgeball Server SDK into your application's backend code.
Create Your First Checkpoint
Visit the Checkpoint Studio and click "Create New Checkpoint" to get started. You can create as many checkpoints as you want. You can call it whatever you want, but we recommend using a name that describes the action you're protecting (e.g. CREATE_ACCOUNT, LOGIN, CREATE_LISTING, MAKE_PAYMENT). You can also add a description to help you remember what the checkpoint is for.
Checkpoints may reference 3rd party services from our Service Catalog or your own internal systems via an API call.
Note: Your code calls checkpoints by name. To prevent unintentionally breaking your code, you can't change the name of a checkpoint once it's created.
Test that it's working
-
Update your server-side code to include a call to the checkpoint you just created. Be sure to pass along the source token that was returned from the client-side SDK.
-
Use your application to make a call to the checkpoint. Then, take a look at your Developer Center > Checkpoint Logs to see the checkpoint logs for your application. You should see a log for the checkpoint you just called.
-
Make a change to your checkpoint, hit the "Publish" button in the top right, and then call the checkpoint again. You should see a new log for the checkpoint with the updated version.
That's it! You've successfully integrated Dodgeball into your application. You can now start protecting your application's endpoints and dynamically loading integrations.